Tutorial 3: Writing different types of data to the XLSX File#
In the previous section we created a simple spreadsheet with formatting using Python and the XlsxWriter module.
This time let’s extend the data we want to write to include some dates:
expenses = (
    ['Rent', '2013-01-13', 1000],
    ['Gas',  '2013-01-14',  100],
    ['Food', '2013-01-16',  300],
    ['Gym',  '2013-01-20',   50],
)
The corresponding spreadsheet will look like this:
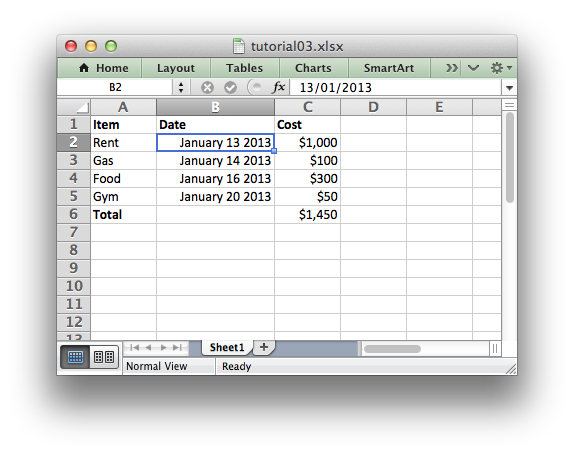
The differences here are that we have added a Date column with formatting and made that column a little wider to accommodate the dates.
To do this we can extend our program as follows:
(The significant changes are shown with a red line.)
 from datetime import datetime
 import xlsxwriter

 # Create a workbook and add a worksheet.
 workbook = xlsxwriter.Workbook('Expenses03.xlsx')
 worksheet = workbook.add_worksheet()

 # Add a bold format to use to highlight cells.
 bold = workbook.add_format({'bold': 1})

 # Add a number format for cells with money.
 money_format = workbook.add_format({'num_format': '$#,##0'})

 # Add an Excel date format.
 date_format = workbook.add_format({'num_format': 'mmmm d yyyy'})

 # Adjust the column width.
 worksheet.set_column(1, 1, 15)

 # Write some data headers.
 worksheet.write('A1', 'Item', bold)
 worksheet.write('B1', 'Date', bold)
 worksheet.write('C1', 'Cost', bold)

 # Some data we want to write to the worksheet.
 expenses = (
     ['Rent', '2013-01-13', 1000],
     ['Gas',  '2013-01-14',  100],
     ['Food', '2013-01-16',  300],
     ['Gym',  '2013-01-20',   50],
 )

 # Start from the first cell below the headers.
 row = 1
 col = 0

 for item, date_str, cost in (expenses):
     # Convert the date string into a datetime object.
     date = datetime.strptime(date_str, "%Y-%m-%d")

     worksheet.write_string  (row, col,     item              )
     worksheet.write_datetime(row, col + 1, date, date_format )
     worksheet.write_number  (row, col + 2, cost, money_format)
     row += 1

 # Write a total using a formula.
 worksheet.write(row, 0, 'Total', bold)
 worksheet.write(row, 2, '=SUM(C2:C5)', money_format)

 workbook.close()
The main difference between this and the previous program is that we have added a new Format object for dates and we have additional handling for data types.
Excel treats different types of input data, such as strings and numbers,
differently although it generally does it transparently to the user.
XlsxWriter tries to emulate this in the
worksheet.write() method by mapping Python data
types to types that Excel supports.
The write() method acts as a general alias for several more specific
methods:
In this version of our program we have used some of these explicit write_
methods for different types of data:
worksheet.write_string  (row, col,     item              )
worksheet.write_datetime(row, col + 1, date, date_format )
worksheet.write_number  (row, col + 2, cost, money_format)
This is mainly to show that if you need more control over the type of data you
write to a worksheet you can use the appropriate method. In this simplified
example the write() method would actually have worked just as well.
The handling of dates is also new to our program.
Dates and times in Excel are floating point numbers that have a number format
applied to display them in the correct format. If the date and time are Python
datetime objects XlsxWriter makes the required number conversion
automatically. However, we also need to add the number format to ensure that
Excel displays it as as date:
from datetime import datetime
...

date_format = workbook.add_format({'num_format': 'mmmm d yyyy'})
...

for item, date_str, cost in (expenses):
    # Convert the date string into a datetime object.
    date = datetime.strptime(date_str, "%Y-%m-%d")
    ...
    worksheet.write_datetime(row, col + 1, date, date_format )
    ...
Date handling is explained in more detail in Working with Dates and Time.
The last addition to our program is the set_column() method to adjust the
width of column ‘B’ so that the dates are more clearly visible:
# Adjust the column width.
worksheet.set_column('B:B', 15)
That completes the tutorial section.
In the next sections we will look at the API in more detail starting with The Workbook Class.