Working with Polars and XlsxWriter#
Polars is a fast dataframe library for Rust and Python.
Polars provides very tight integration of XlsxWriter and supports a lot of features such as conditional formats, tables, autofilters, autofit and others without having to use the external library directly. At the same time it allows use of native XlsxWriter workbook and worksheets objects to take advantage of any features that it doesn’t support.
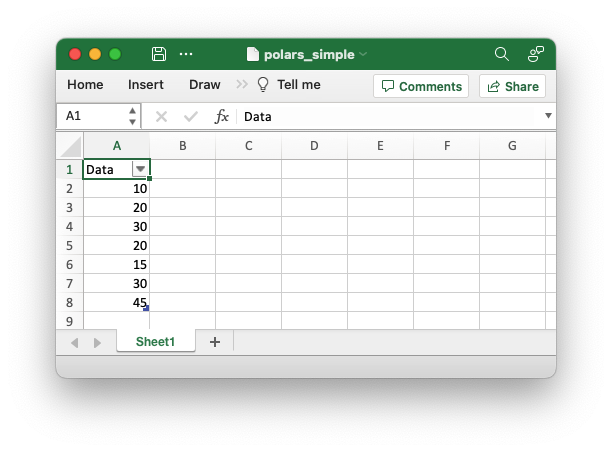
Creating an Excel file from a dataframe with Polars is straightforward and
doesn’t require any direct invocation of XlsxWriter. All that is required is to
use the write_excel() method with a Polars dataframe:
import polars as pl

df = pl.DataFrame({"Data": [10, 20, 30, 20, 15, 30, 45]})

df.write_excel(workbook="polars_simple.xlsx")
This is a complete example and the output from this would look like the following:
The write_excel() API is explained in detail in the Polars documentation.
One interesting aspect of the Polars output is that it writes the dataframe as
an Excel Data Table. We will discuss this and other XlsxWriter
features that are available from write_excel() in the sections below.
Sharing XlsxWriter workbooks with Polars#
In a majority of use cases you will be able to control the output workbook and worksheets via the write_excel() APIs but there may be some situations you may wish to start a normal XlsxWriter workbook and then add Polars data to it.
To do this you can create a workbook object and pass it to the
workbook parameter of Polars write_excel():
import xlsxwriter
import polars as pl

df = pl.DataFrame({"Data": [10, 20, 30, 20, 15]})

with xlsxwriter.Workbook("polars_xlsxwriter.xlsx") as workbook:
    df.write_excel(workbook=workbook)
Output:
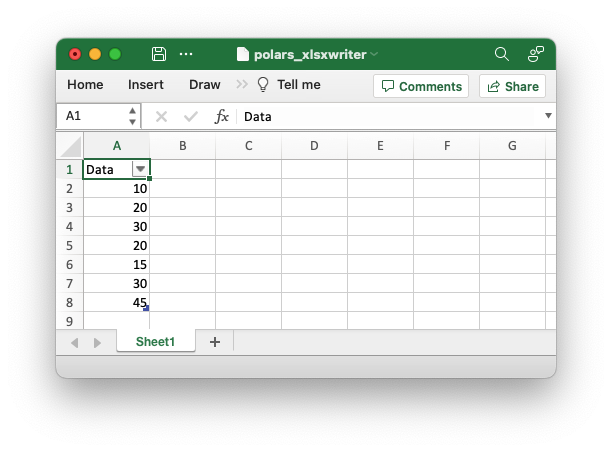
As can be seen from the image, Polars creates a new worksheet and adds the data to it. However, you can also add Polars data to a worksheet created from XlsxWriter:
import xlsxwriter
import polars as pl

df = pl.DataFrame({"Data": [10, 20, 30, 20, 15, 30, 45]})

with xlsxwriter.Workbook("polars_xlsxwriter.xlsx") as workbook:
    # Create a new worksheet.
    worksheet = workbook.add_worksheet()

    # Do something with the worksheet.
    worksheet.write("A1", "The data below is added by Polars")

    # Write the Polars data to the worksheet created above, at an offset to
    # avoid overwriting the previous text.
    df.write_excel(workbook=workbook, worksheet="Sheet1", position="A2")
Output:
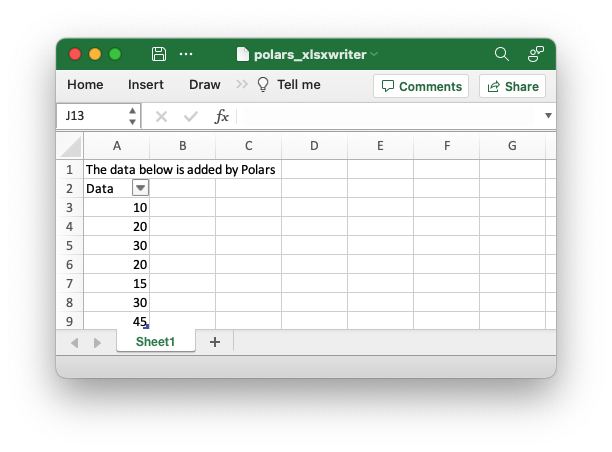
(See the example at Example: Polars integration with XlsxWriter.)
Adding Charts to Dataframe output#
With the techniques shown above we can get access to the Workbook and Worksheet objects and then use them to apply other features such as adding a chart:
import xlsxwriter
import polars as pl

df = pl.DataFrame({"Data": [10, 20, 30, 20, 15, 30, 45]})

with xlsxwriter.Workbook("polars_chart.xlsx") as workbook:
    # Create the worksheet so we can reuse it later.
    worksheet = workbook.add_worksheet()

    # Write the Polars data to the worksheet created above.
    df.write_excel(workbook=workbook, worksheet="Sheet1")

    # Create a chart object.
    chart = workbook.add_chart({"type": "column"})

    # Get the dimensions of the dataframe.
    (max_row, max_col) = df.shape

    # Configure the series of the chart from the dataframe data.
    chart.add_series({"values": ["Sheet1", 1, max_col - 1, max_row, max_col - 1]})

    # Insert the chart into the worksheet.
    worksheet.insert_chart(1, 3, chart)
The output would look like this:
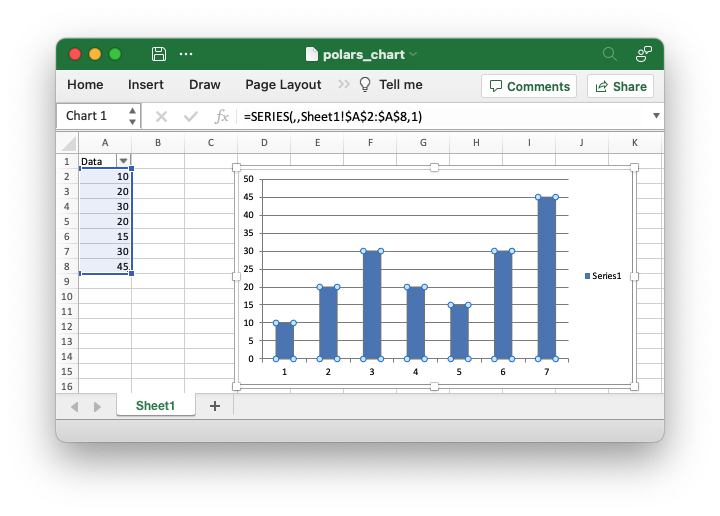
(See the example at Example: Polars Excel output with a chart.)
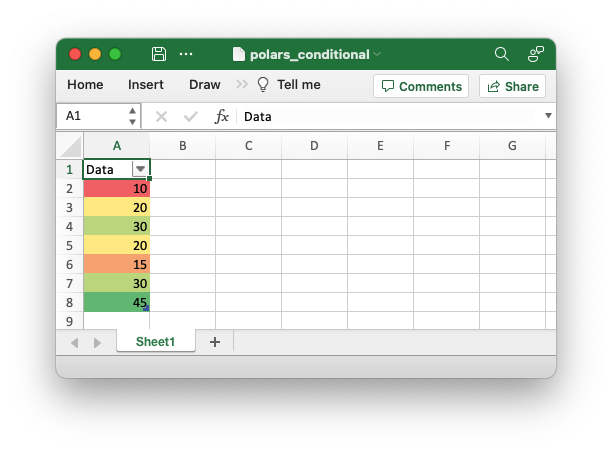
Adding Conditional Formatting to Dataframe output#
Following on from the technique shown in the previous sections we could also add a conditional format to the dataframe data like this:
import xlsxwriter
import polars as pl

with xlsxwriter.Workbook("polars_conditional.xlsx") as workbook:
    df = pl.DataFrame({"Data": [10, 20, 30, 20, 15, 30, 45]})

    worksheet = workbook.add_worksheet()

    # Write the Polars data to the worksheet created above.
    df.write_excel(workbook=workbook, worksheet="Sheet1")

    # Get the dimensions of the dataframe.
    (max_row, max_col) = df.shape

    # Apply a conditional format to the required cell range.
    worksheet.conditional_format(1, max_col - 1, max_row, max_col - 1,
                                {"type": "3_color_scale"})
However, this can also be done directly and more succinctly using the Polars
write_excel() APIs:
import polars as pl

df = pl.DataFrame({"Data": [10, 20, 30, 20, 15, 30, 45]})

df.write_excel(
    workbook="pandas_conditional.xlsx",
    conditional_formats={"Data": {"type": "3_color_scale"}},
)
Which would give:
See the full example at Example: Polars Excel output with conditional formatting and the section of the docs on Working with Conditional Formatting.
Handling multiple Polars Dataframes#
It is possible to write more than one dataframe to a worksheet or to several worksheets. For example to write multiple dataframes to multiple worksheets:
with xlsxwriter.Workbook("polars_multiple.xlsx") as workbook:
    df1.write_excel(workbook=workbook)
    df2.write_excel(workbook=workbook)
    df3.write_excel(workbook=workbook)
(See the full example at Example: Polars Excel with multiple dataframes.)
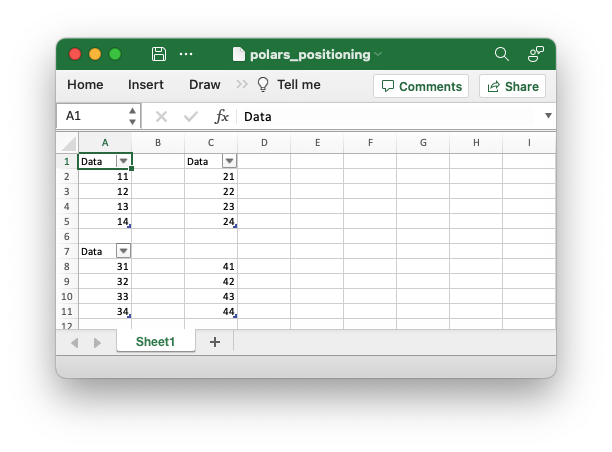
It is also possible to position multiple dataframes within the same worksheet:
with xlsxwriter.Workbook("polars_positioning.xlsx") as workbook:
    # Write the dataframe to the default worksheet and position: Sheet1!A1.
    df1.write_excel(workbook=workbook)

    # Write the dataframe using a cell string position.
    df2.write_excel(workbook=workbook, worksheet="Sheet1", position="C1")

    # Write the dataframe using a (row, col) tuple position.
    df3.write_excel(workbook=workbook, worksheet="Sheet1", position=(6, 0))

    # Write the dataframe without the header.
    df4.write_excel(
        workbook=workbook,
        worksheet="Sheet1",
        position="C8",
        include_header=False)
Output:
(See the full example at Example: Polars Excel dataframe positioning.)
Formatting the dataframe output#
Polars uses some sensible default formatting for different data types. For example consider this dataframe comprised of dates, strings and positive and negative numbers:
from datetime import date
import polars as pl

df = pl.DataFrame(
    {
        "Dates": [date(2023, 1, 1), date(2023, 1, 2), date(2023, 1, 3)],
        "Strings": ["Alice", "Bob", "Carol"],
        "Numbers": [0.12345, 100, -99.523],
    }
)

df.write_excel(workbook="polars_format_default.xlsx", autofit=True)
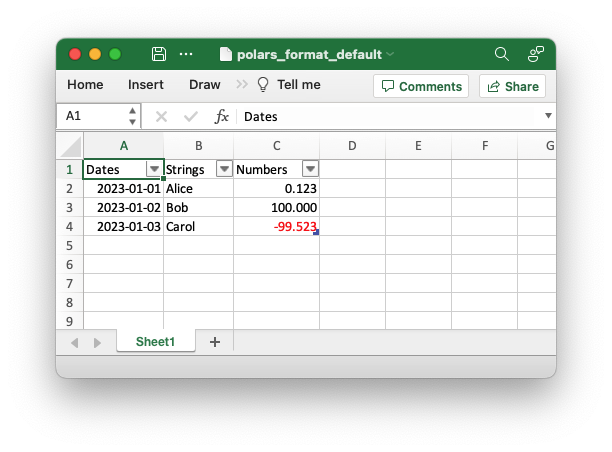
(See the full example at Example: Polars default format example).
As can be seen the dates are formatted with a "yyyy-mm-dd" style format and
the numbers are formatted to 3 decimal places with negative numbers shown in red
(using the number format "#,##0.000;[Red]-#,##0.000"). We also used the
autofit parameter in this example to autofit the column widths.
One thing to note from the previous examples is that the Polars dataframes are added to the Excel worksheet as Excel Data Tables. This can be seen from the green corner symbol in the bottom right of the dataframe values and from the table view:
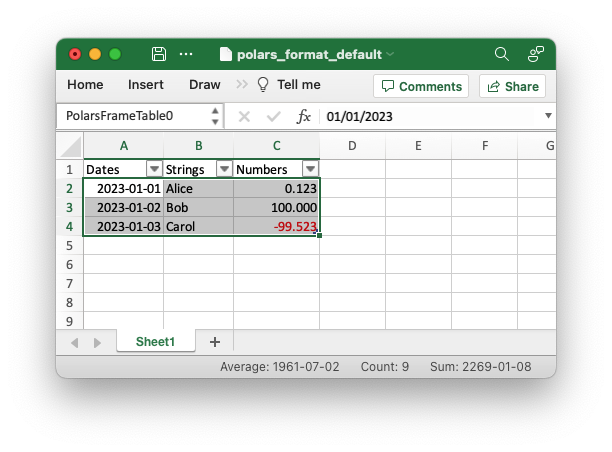
Tables are a useful Excel data representation that is analogous to a Python
dataframe. We can also use the table properties as well as some of the Polars
write_excel() options to add some more formatting to the previous example:
from datetime import date
import polars as pl

# Create a Pandas dataframe with some sample data.
df = pl.DataFrame(
    {
        "Dates": [date(2023, 1, 1), date(2023, 1, 2), date(2023, 1, 3)],
        "Strings": ["Alice", "Bob", "Carol"],
        "Numbers": [0.12345, 100, -99.523],
    }
)

# Write the dataframe to a new Excel file with formatting options.
df.write_excel(
    workbook="polars_format_custom.xlsx",

    # Set an alternative table style.
    table_style="Table Style Medium 4",

    # See the floating point precision for reals.
    float_precision=6,

    # Set an alternative number/date format for Polar Date types.
    dtype_formats={pl.Date: "yyyy mm dd;@"},

    # Add totals to the numeric columns.
    column_totals=True,

    # Autofit the column widths.
    autofit=True,
)
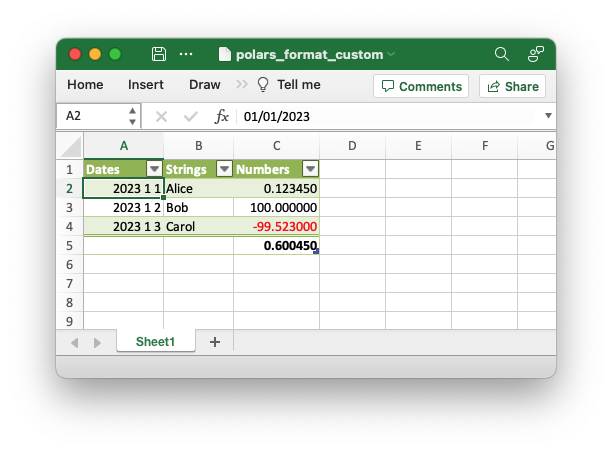
(See the full example at Example: Polars custom format example).
Adding Sparklines to the output dataframe#
We can also add sparklines to the dataframe output:
import polars as pl

df = pl.DataFrame(
    {
        "Zone": ["North", "South", "East", "West", "Central"],
        "Q1": [100, 55, -20, 0, 35],
        "Q2": [30, -10, 15, 60, 20],
        "Q3": [-50, 0, 40, 80, 80],
        "Q4": [75, 55, 25, -10, -55],
    }
)

# Write the dataframe with sparklines and some additional formatting.
df.write_excel(
    workbook="polars_sparklines.xlsx",

    # Set an alternative table style.
    table_style="Table Style Light 2",

    # Specify an Excel number format for integer types.
    dtype_formats={pl.Int32: "#,##0_);(#,##0)"},

    # Configure sparklines to the dataframe.
    sparklines={
        # We use the default options with just  the source columns.
        "Trend": ["Q1", "Q2", "Q3", "Q4"],

        # We also add a customized sparkline type, with a positioning directive.
        "Change": {
            "columns": ["Q1", "Q2", "Q3", "Q4"],
            "insert_after": "Zone",
            "type": "win_loss",
        },
    },
    column_totals=["Q1", "Q2", "Q3", "Q4"],

    # Hide the default gridlines on the worksheet.
    hide_gridlines=True,
)
Output:
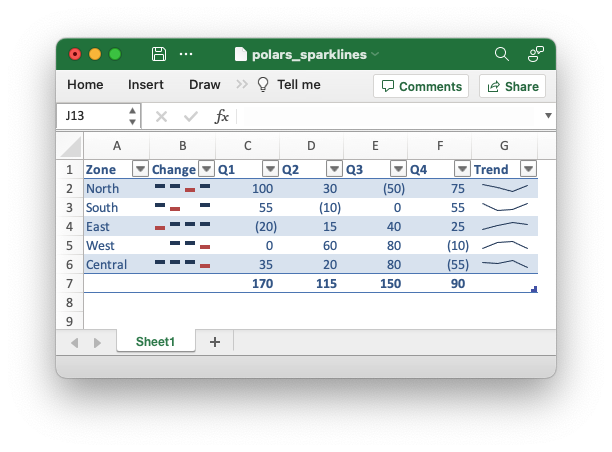
(See the full example at Example: Polars Excel output with sparklines).
See also Working with Sparklines.